
web3 学习笔记
web3学习笔记
依赖加载
页面需要加载web3的js,为方便学习,还使用了jq
<script src="https://cdn.jsdelivr.net/npm/web3@latest/dist/web3.min.js"></script>
<!-- web3.min.js 会在window下面定义一个Web3的对象 -->
<script src="https://code.jquery.com/jquery-2.1.1.min.js"></script>
<script src="./connect.js"></script>
初始化web3
初始化web3 需要提供provider,provider可以使用metamask钱包提供的,也可以使用注册infura提供的provider。由于我是在goerli的以太测试网络上,infura上的地址需要进行切换
// connect.js
window.onload = async function () {
  let currentAddress	// 存储自己当前的钱包地址
  let web3Provider	// web3provider
  const rpcUrl = "https://goerli测试网络.infura.io/v3/你自己申请的infura地址"

  if (window.ethereum) {
    // 新版matamask 会在窗口下注册ethereum对象
    web3Provider = window.ethereum
  } else {
    // 或者使用infura的地址,
    web3Provider = new Web3.providers.HttpProvider(rpcUrl)
  }

  window.web3 = new Web3(web3Provider)
}
这样我们就成功的获得了web3,具体怎么详细使用web3,可以查看web3的官方文档
连接metamask钱包
页面添加按钮元素
<p>连接状态</p>
<p class="address">null</p>
<button id="connect">连接钱包</button>
connect.js添加getAccountAdress方法,可以获取当前的钱包地址,反过来,也可以根据能否获取到钱包地址来判断有没有连接到钱包
// 获取钱包地址,可以判断有没有连接钱包
const getAccountAddress = async () => {
  const address = await web3.eth.getCoinbase()
  if (address) {
    $('.address').html(address)
    currentAddress = address	// 存放钱包地址
  } else {
    $('.address').html('还没有连接钱包')
  }
}
getAccountAddress()	// 之前获取地址判断有没有连接到钱包
这个时候打开页面,会显示还没有连接到钱包

添加连接钱包按钮的事件
// 连接钱包操作
$('#connect').on('click', async () => {
  if (window.ethereum) {
    try {
    	// 如果存在metamask钱包,尝试请求授权
      await window.ethereum.enable()
      // 获取钱包地址
      getAccountAddress()
    } catch (error) {
      console.log({ error });
    }
  } else {
    console.log('需要安装钱包插件');
  }
})
当我们点击连接按钮的时候,metamask钱包会弹出授权请求的窗口

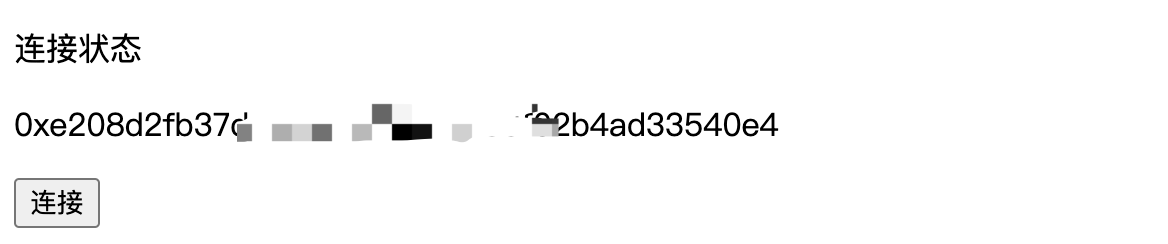
当我们点击下一步并允许当前页面连接的时候,页面就会变成
监听钱包的切换操作
由于metamask钱包可以存在多个账号,也可以随时切换账户,所以我们需要对钱包地址的切换添加一个监听的方法
// 钱包账号切换监听,metamask提供的ethereum对象会提供一个accountsChanged的监听方法
window.ethereum.on('accountsChanged', async (accounts) => {
  console.log({accounts})
  await getAccountAddress()
})
这个时候我们切换metamask钱包账户的时候,页面也会获取到最新的钱包地址。
获取当前的链ID和余额
metamask钱包一个账户可以切换多条的链,这个时候我们就需要获取到当前的链id,来进行业务逻辑判断。
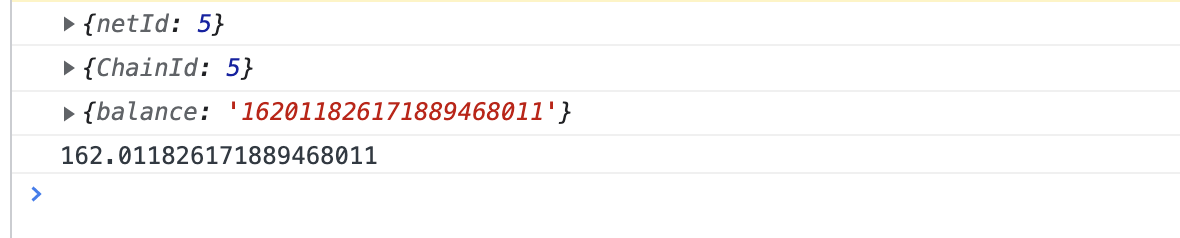
const netId = await web3.eth.net.getId()
console.log({netId})

const ChainId = await web3.eth.getChainId()
console.log({ChainId})

// 获取余额 下面连个方法都可以获取到当前的账户余额
// const balance = await web3.eth.getBalance(await web3.eth.getCoinbase())
const balance = await web3.eth.getBalance(currentAddress)
console.log({balance})
// 单位不一样,使用web3提供的工具方法换算
console.log(web3.utils.fromWei(balance))
由于是在学习,所以我使用的是goerli的以太测试链,测试链上的以太可以在goerli测试网水龙头获取,钱包连接上,再输入验证码即可,可以多申请几次,注意验证码上是大小写敏感的。如果还不行,一些discord频道上会发放一些。这些自己去关注即可。
下面是控制台查看得出。goerli测试链的链ID是5。主网是1。

查询交易
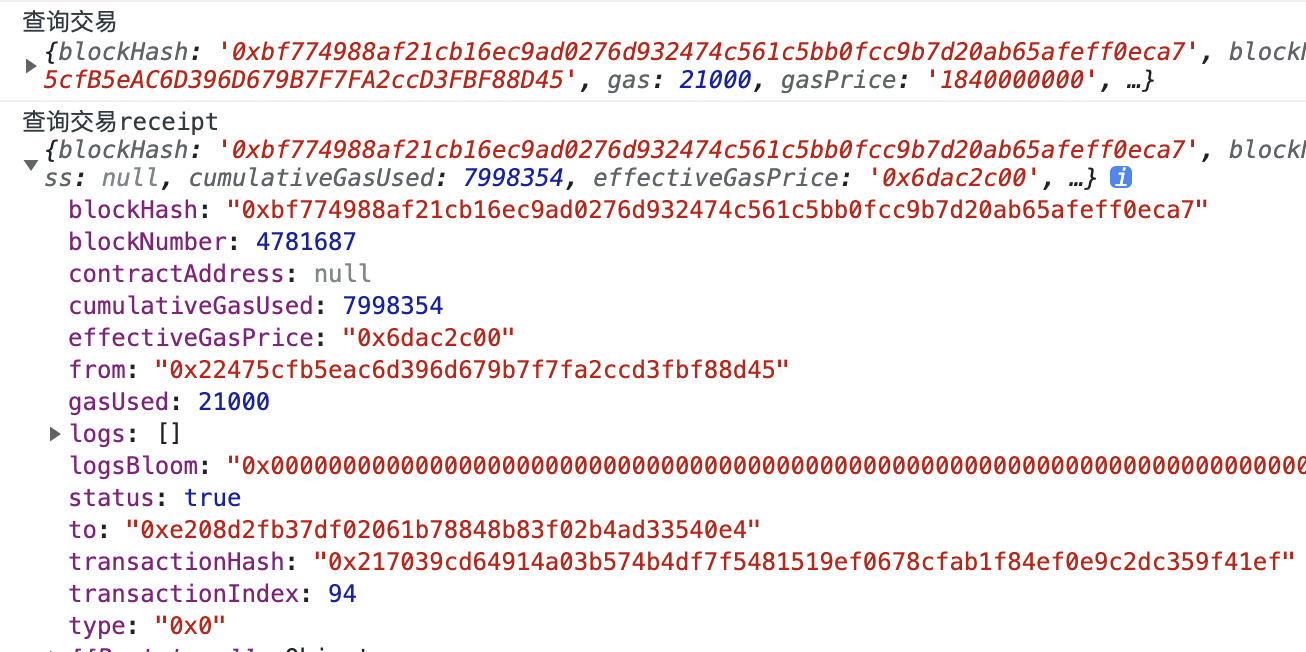
我们经常会用交易hash来查询一些交易信息
// 查询交易
console.log("查询交易", await web3.eth.getTransaction('0x217039cd64914a03b574b4df7f5481519ef0678cfab1f84ef0e9c2dc359f41ef'))

// 查询交易Receipt,一般通过这里的status来判断交易是否成功
// status - Boolean: TRUE if the transaction was successful, FALSE if the EVM reverted the transaction
console.log("查询交易receipt", await web3.eth.getTransactionReceipt('0x217039cd64914a03b574b4df7f5481519ef0678cfab1f84ef0e9c2dc359f41ef'))
可以查询到交易的信息
发送交易
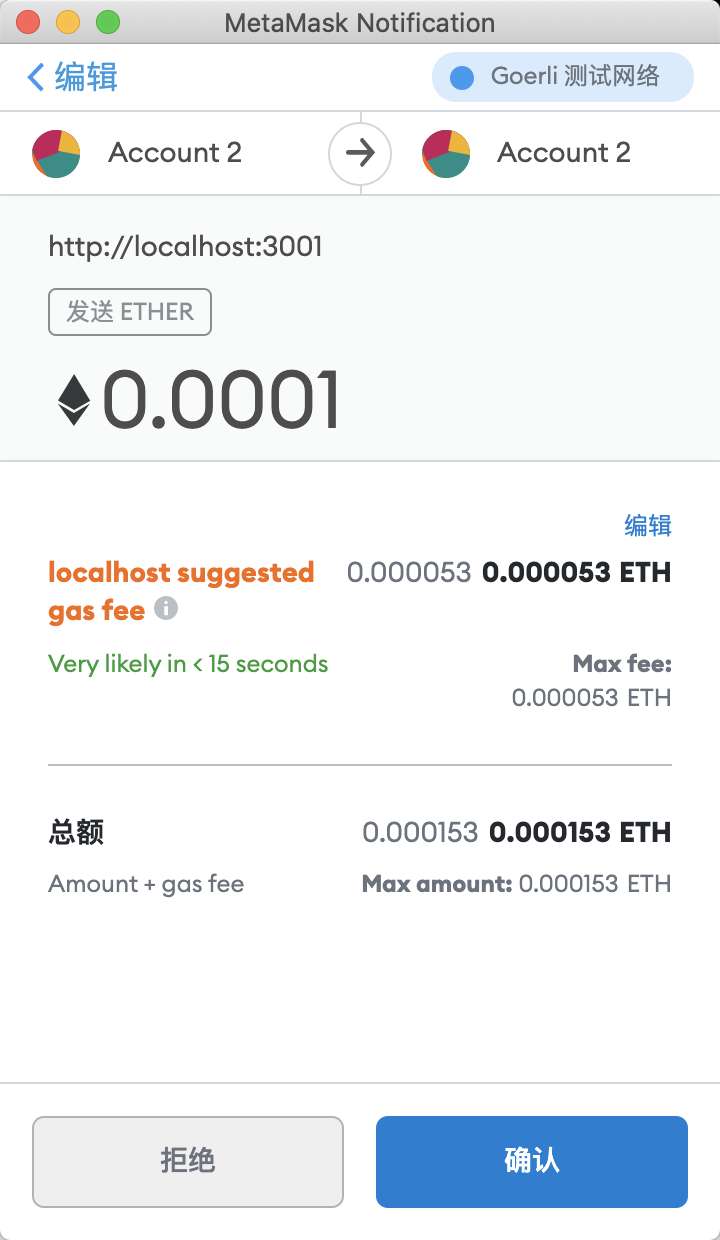
接下来,可以试试自己给自己发送0.0001个以太试试交易。
页面上面先添加一个发送交易的按钮
<p>
  <button id="testSend">发送eth交易</button>
</p>
先在connect.js中封装发送eth的方法sendTransaction
// 发送交易
const sendTransaction = (obj) => {
  return new Promise((resolve, reject) => {
    web3.eth.sendTransaction(obj)
      .on('transactionHash', hash => {
        console.log('获取交易hash: ', hash)
        resolve(hash)
      })
      .on('receipt', receipt => {
        console.log('获取链上返回的结果:', receipt)
      })
      .on('confirmation', (confirmationNumber, receipt, latestBlockHash) => {
        console.log("链上confirmation结果返回,确认数:",confirmationNumber)
        console.log("链上confirmation结果返回,返回数据:",receipt)
      })
      .on('error', (error, gasError) => {
        // 如果是 out of gas 错误, 第二个参数为交易收据
        console.error('错误:', error)
        reject(error)
      })
  })
}
这个时候我们再给按钮添加上点击事件
$('#testSend').on('click', async () => {
  try {
    const result = await sendTransaction({
      from: currentAddress,
      to: currentAddress,
      value: 100000000000000,
      gas: 21000
    })
    console.log({result});
  } catch (error) {
    console.log('发送按钮发送失败:', error);
  }
})
这样当我们点击发送eth按钮的时候。便会调用起了钱包
发送erc20代币
要发送erc20代币,我们这里选择uni来学习测试一下。
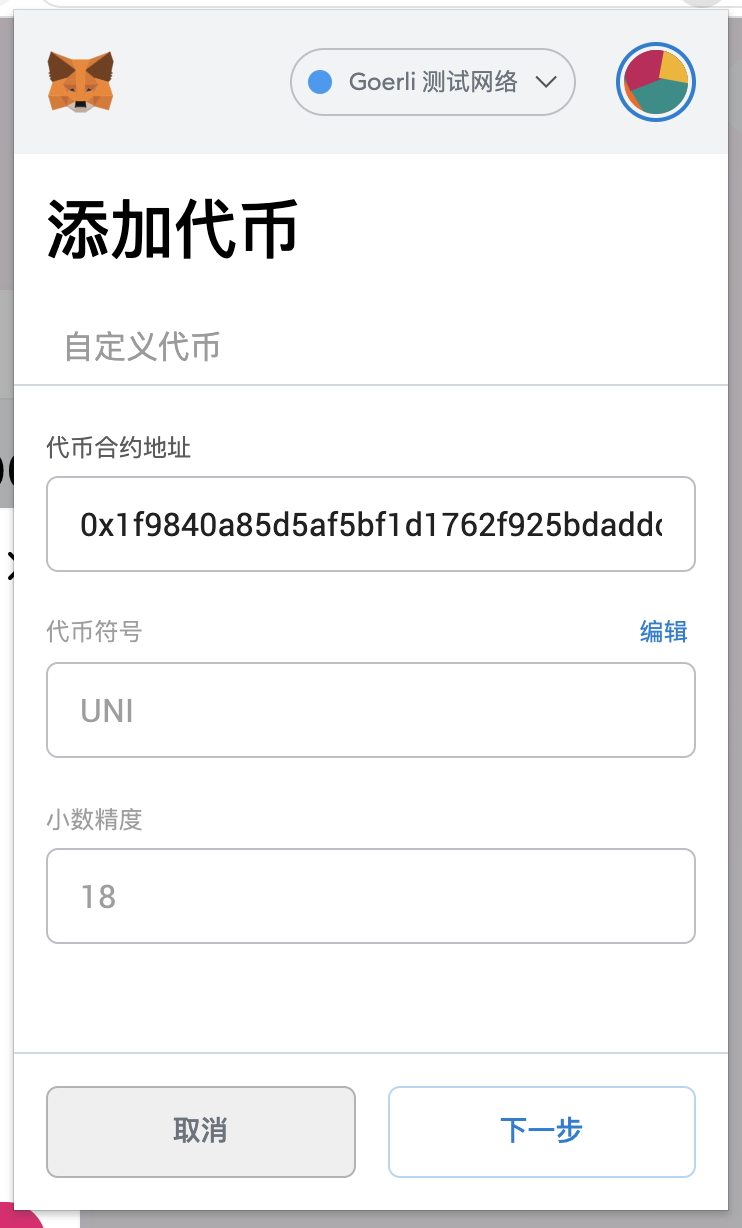
首先我们需要在metamask上面添加代币显示。uni的合约地址是0x1f9840a85d5af5bf1d1762f925bdaddc4201f984。我们在钱包下面找到添加代币按钮。然后输入代币的合约地址,继续添加。
可是我们测试网络没有uni代币怎么办?没关系,我们可以在uniswap去兑换一些。uniswap也是支持goerli测试网络的。
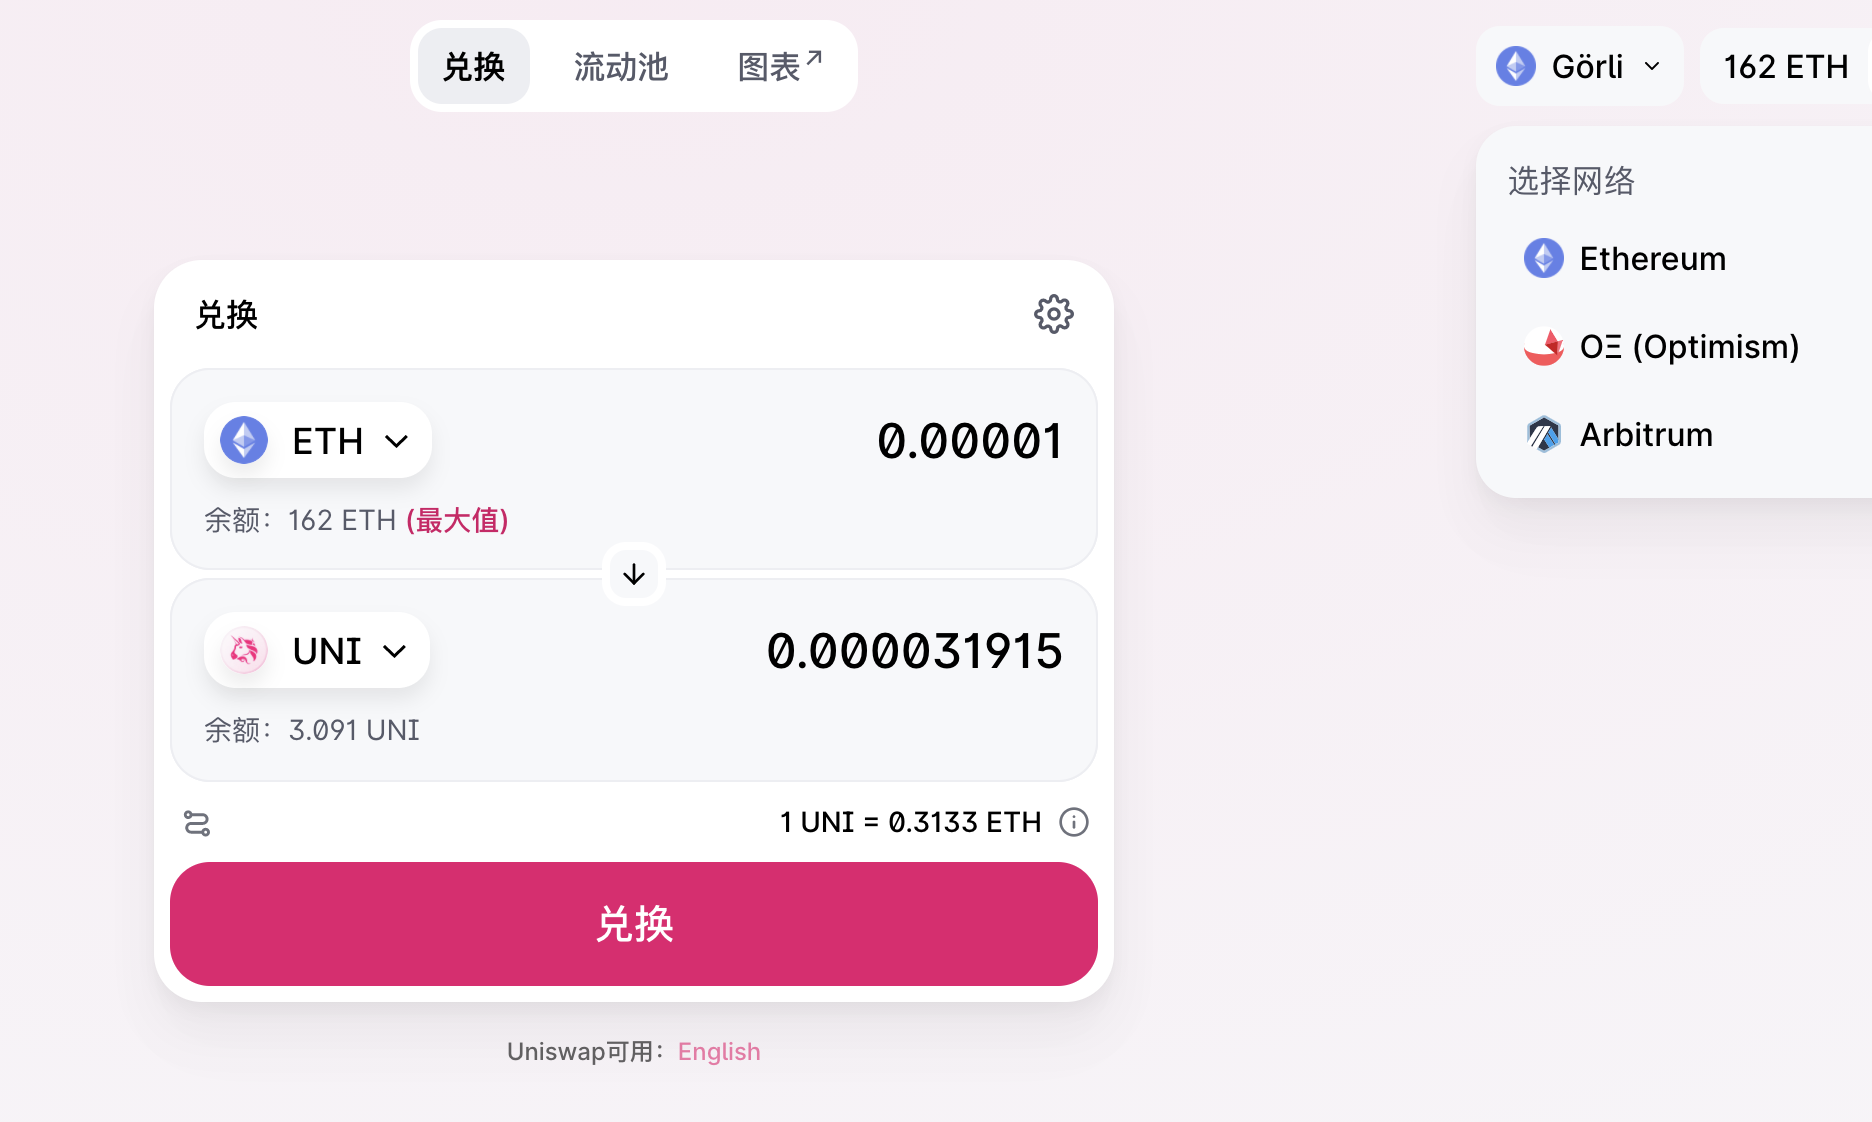
好了,这样我们账户上便有了一点uni的代币。
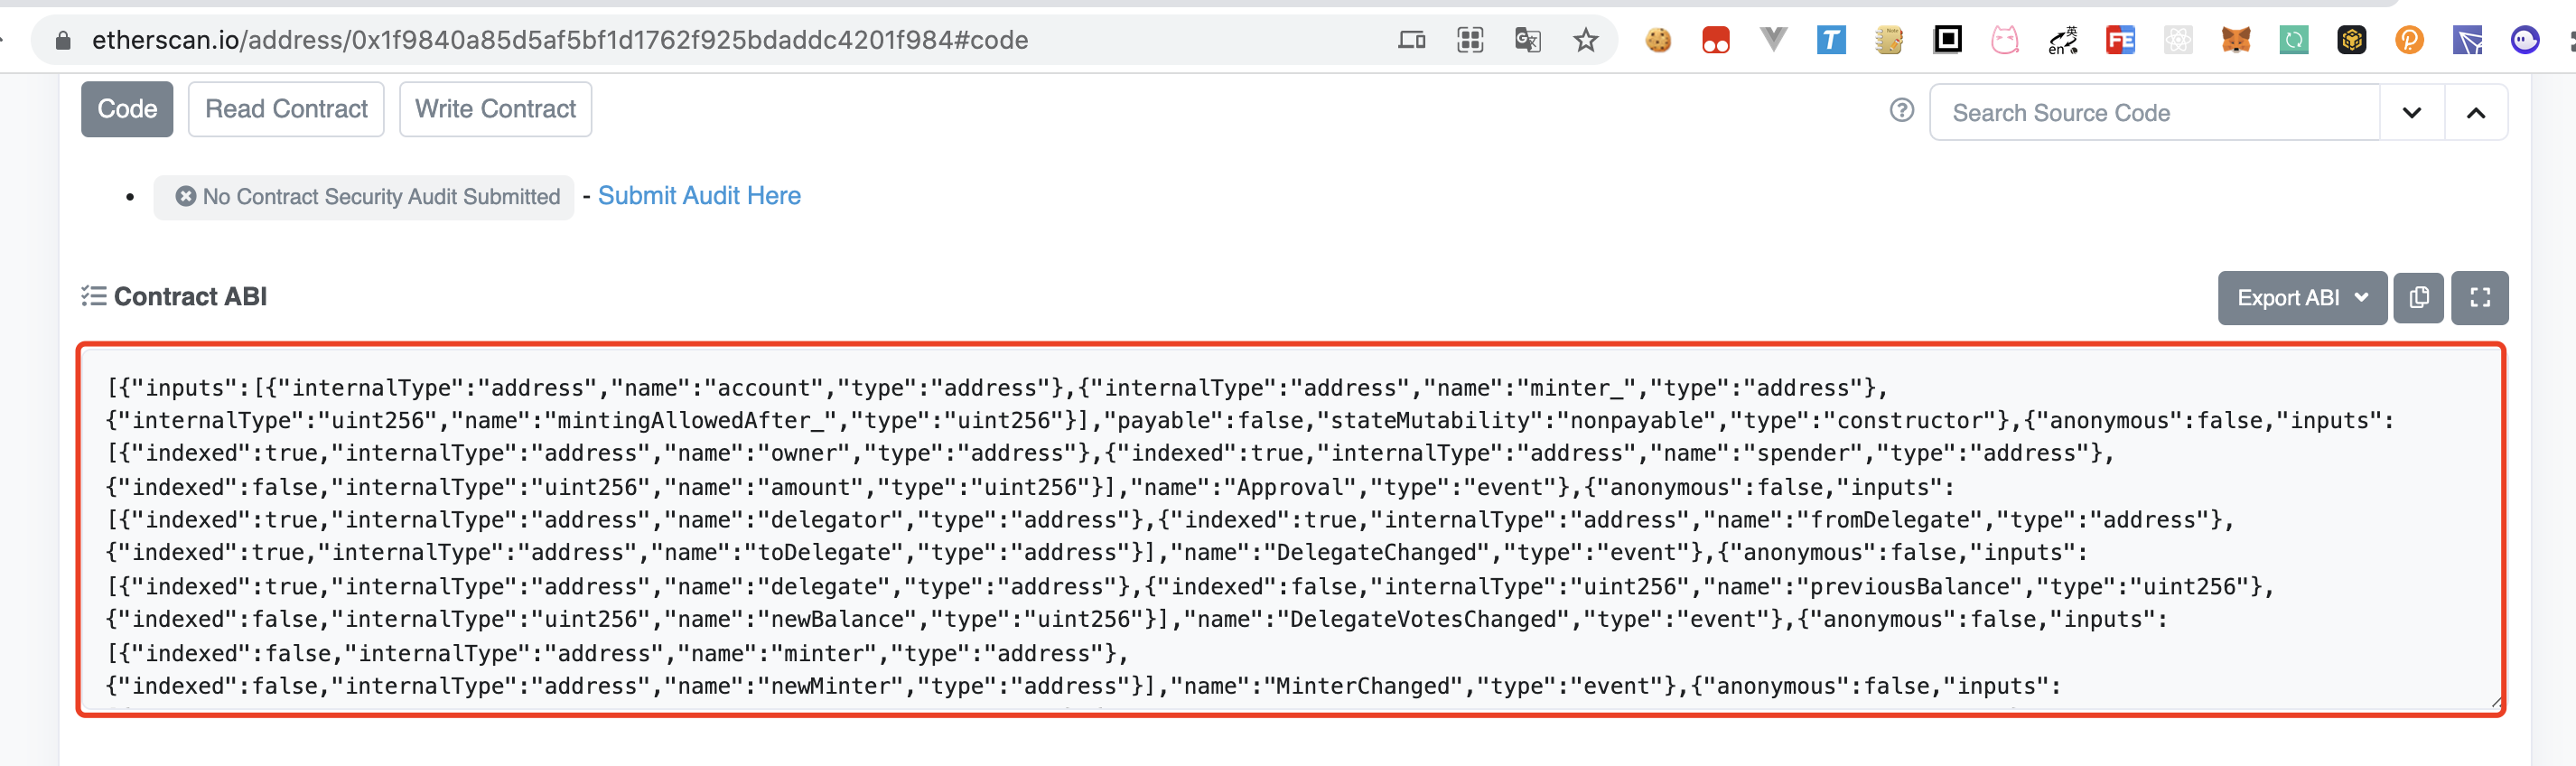
接下来,我们需要找到uni的abi信息。直接去主网的区块浏览器上去找合约信息。uni区块浏览器地址,我们复制它的abi信息。
接下来,我们继续coding。获取代币的数量。
const uniContractAddress = '0x1f9840a85d5af5bf1d1762f925bdaddc4201f984'
const uniswapAbi = 我们刚才上面复制的abi信息

const uniToken = new web3.eth.Contract(uniswapAbi, uniContractAddress, {
  from: currentAddress,
})

// 获取uni代币余额
const tokenNum = await uniToken.methods.balanceOf(currentAddress).call()
const format = web3.utils.fromWei(tokenNum) // 获取代币数量
console.log({tokenNum, format})

去封装发送uni代币的方法
const transferToken = ({from = currentAddress, to = currentAddress, tokenNum = 1000}) => {
  return new Promise((resolve, reject) => {
    uniToken.methods.transfer(to, tokenNum).send({from})
      .on('transactionHash', hash => {
        console.log('获取交易hash: ', hash)
        resolve(hash)
      })
      .on('confirmation', (confirmationNumber, receipt) => {
        console.log("链上confirmation结果返回,确认数:",confirmationNumber)
        console.log("链上confirmation结果返回,返回数据:",receipt)
      })
      .on('receipt', receipt => {
        console.log('获取链上返回的结果:', receipt)
      })
      .on('error', (error, gasError) => {
        // 如果是 out of gas 错误, 第二个参数为交易收据
        console.error('错误:', error)
        reject(error)
      })
  })
}
页面上面添加发送代币的按钮
<p>
  <button id="testSendToken">发送ERC20代币交易</button>
</p>
connect.js加上按钮点击事件
$('#testSendToken').on('click', async () => {
  try {
    const result = await transferToken({
      from: currentAddress,
      // to: currentAddress,
      to: '0x3EcAa09DD6B8828607bba4B1d7055Ea1143f8B94',
      // 这里吃了个亏,直接写数字会有问题,需要web3.utils.toBN去转换一下。
      tokenNum: web3.utils.toBN(100000000000000000)
    })
    console.log({result});
  } catch (error) {
    console.error({error});
  }
})
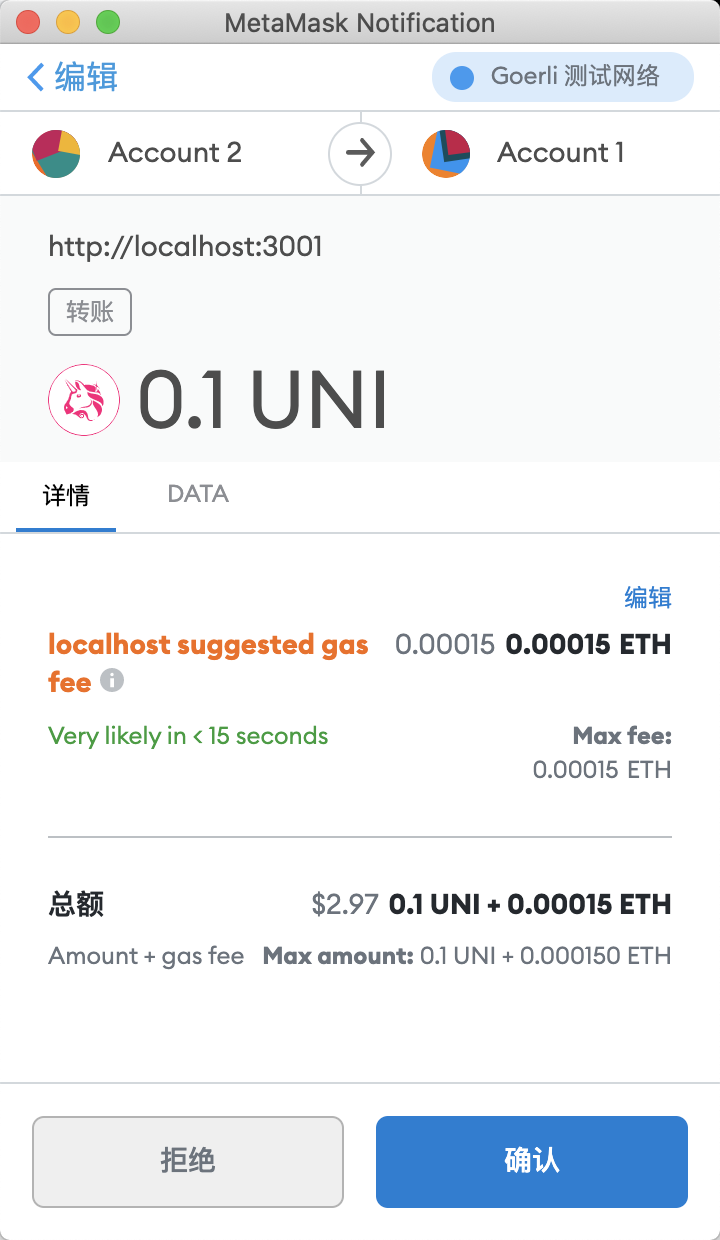
好了,我们试试发送erc20,成功调出钱包窗口。
暂时先学到这里,之后再有需要可以看看web3的官方文档继续尝试。
评论区